

When I first got married and had Christmas with my in-laws I was awe struck by their drawstring santa sacks instead of stockings! My Mother-In-Law would fill each persons sack with personalized goodies and gifts. I have always love that tradition!
So, a few years ago, I decided to finally make some for our family too! Ignore the fact that I decided to do this only 48 hours before Christmas morning! Haha! Thankfully, I had a wonderful fabric shop owner who let me come grab some fabric last minute (Thank you Jamie from @pink_peony_creations). I was able to pick out some perfect Christmas fabrics and colors for each of the members of my family!
Pinterest has an abundance of tutorials and patterns for drawstring bags. I took inspiration from several of them to create these. The majority of the instructions I followed, I found on Jeni Baker’s tutorial for Lined Drawstring Bags. She has great instructions and a video tutorial! You can check out her instagram @jenib320 for tons of inspo on her bags and using them as reusable gift wrap- love that!


All of my fabrics are Art Gallery solids and prints except for the winter wonderland print which is from Rifle Paper Co.
Dimensions FOR my Santa Sack
You might notice that the bags I made are much larger than the ones in the tutorial I linked to. So I thought I would save you the headache of trial and error and give you my tried and true measurements that worked perfectly for making these alternatives to stockings. I wanted to make sure they were big enough to hold some books, coloring books, candy, some small toys, and fake fluffy snowballs! Here are the measurements I used:
- Main exterior Fabric: (2) 18″ x 17″ pieces
- Accent Exterior Fabric: (2) 18″ x 5″ pieces
- Interior Lining Fabric: (2) 18″ x 21.5″ pieces
- I also used a heavy duty twine that I got here on amazon but you could also use this macrame cord that comes in many colors.
If your fabric is directional, make sure that the you cut them so that the 18″ is how wide the bag will be. Your lining fabric can be all the same (I used a cream lining for most of mine) or use another coordinating color/print so that your bags can be reversible. The possibilities are endless! Also, feel free to switch up the string/rope you use. I put a link to the heavy duty twine that I used (and LOVED the look of), but you can use whatever you want!
Alterations to the Tutorial
When following the tutorial directions that Jeni Baker outlines, I did not leave an opening on both sides of the accent fabric band. I only left an opening on ONE side. Mostly because I wasn’t sure I could shove all that heavy duty rope into the holes, but also because I just didn’t want to bother with it twice. The results were just as good! It is possible that it worked out so well because of the thickness of my rope. So, I would suggest something thicker if you opt for only one opening on your drawstring Santa sacks.
Another thing I altered slightly is the boxing of the corners. I boxed my corners at about 4.5″ because the size of these bags are so much bigger than the ones in her instructions. It worked out perfectly!
Overall
The final result was a Drawstring Santa Sack that measured about 17″ wide by 19″ tall. Perfect for filling with all the Christmas morning goodies! And as an added bonus, they worked great for collecting their gifts and carrying to their rooms! I will probably add their names to their bags (next year)! I hope this was helpful for you and I can’t wait to see what you guys create!

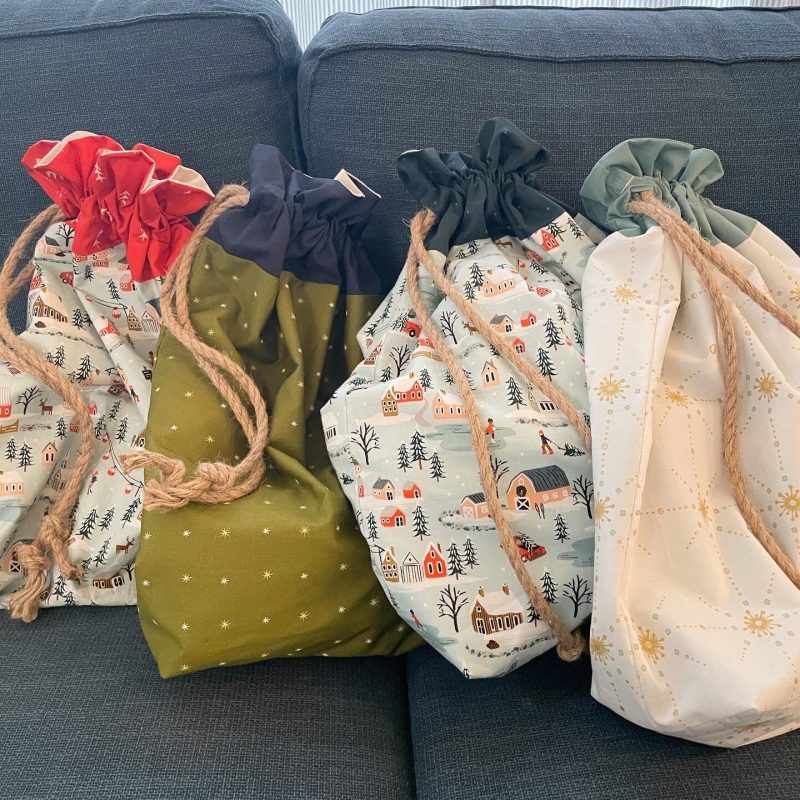
We have four kids and so I needed four Santa Sacks! The first one is for my oldest daughter and is made of a Rifle Paper Company print accented with a simple red print. The second one is for my son and used another more masculine combination of Christmas colors. The third is for my middle daughter using the same Rifle print and accented with a greenish blue. The last one is for my baby girl and used a fun metallic cream print with a dusty blue accent.
These are my husband’s and my Santa Sacks! I chose a more masculine fabric for my husband, accented with a dark red! And, for myself, I chose a feminine floral fabric that wasn’t necessarily a Christmas print, but looks great with the dark red!
Maybe next year I will embroider their names on each one.
Be sure to check out my other tutorials and blog articles here. Or go check out my quilt patterns here.


